Love You To Pieces Love Card - CASE the Catalog Friday on Saturday
Hello crafty people! Ever have one of those days where you think it is one day and it turns out to be a different day??? I know we left on vacation Thursday, but for some reason it didn't dawn on me that this post was meant for yesterday (Friday) until it was Friday afternoon so I decided just to have it go up today. Oh well.....as long as I still get it on my blog it can be a day later then usual. Here is my card for my CASE the Catalog Friday on Saturday.....
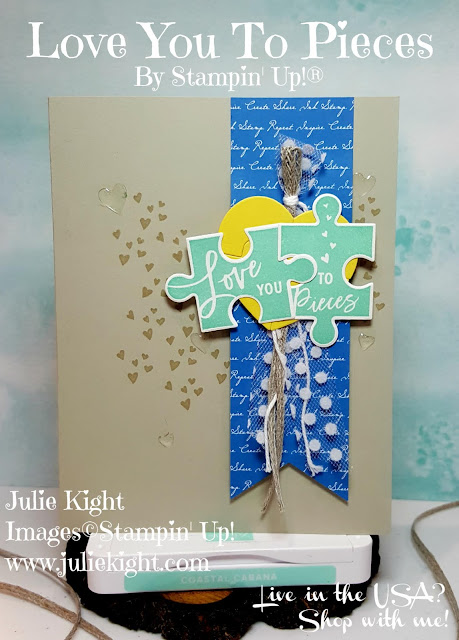
When I look through the catalog to pick the one I want to CASE I look at every sample and see 1) what stamp set did they use and 2) do I like the basic layout of the design. If I think that I can use a different stamp set because maybe I don't own the one that is used in the sample I like because I really like the basic design then I will. But with the one I loved the colors, stamp set, and the design, but I wanted to turn it into a card.....so I did. The sample is from pg 86 in the Annual Catalog.
I knew it would be really easy to change the bag into a card front and I loved the color combo so I stayed with that too. The only thing I didn't have was the Frosted & Clear Epoxy Droplets so I decided to use the Heart Epoxy Droplets instead. Now obviously the bag is more narrow and longer then a card front so I just adjusted where needed. I attached the strip at the top with the Snail adhesive then put Dimensionals about half way down to the bottom for dimension. I die cut the heart with the heart puzzle die then took an extra piece of the same color cardstock, applied some glue to and glued the pieces onto it so it would be easier to use as one piece.
I stamped the two sentiment stamps and die cut each one and joined them how they appear in the sample to the puzzle heart. I took pieces of the various ribbons that was used and I wrapped some White Solid Baker's Twine around them and tied it and let the ends just hang down. I glued the bundle of ribbons to the strip of DSP, then put Dimensionals on the heart and attached it to the card front. I did stamp some of the little hearts around the front with the same color of ink as the card base, Sahara Sand. I randomly placed the clear hearts around the card front too.
For the inside I just did my normal simple as the sample was a bag. I placed a piece of Whisper White down and stamped more of the little hearts and a cute sentiment. I really love how this one came out. The catalogs are full of so many ideas and samples that you can get so much inspiration from. And if you don't own some of the items used then just substitute for something you do have like I did with this project. I really hope today's project inspires you to do something crafty. Thank you for coming to see my project today and I will be back on Monday with something new. Have a great day and weekend!!!
Hugs,
Julie
Here is what I used to make this card.....
USA only
Product List
New Catalog!
It is HERE! Come check out all the new products and if want one all for yourself all I ask is for you to please place at least a $50 order with me as your demonstrator and I will gladly send you one for free. Order here!
If you are unfamiliar with this promotion, for every $50 in product you purchase during the month of July, you will receive a coupon code for $5 to use on another order in August!!! This is a great way to get the items you want from the new Annual catalog and in August get more products, possibly for free! The codes will be emailed to you after you place your order, save them in a folder or print them out and keep in a safe place. There is no limit on how many you can receive!!!
From July 1 until August 31, new demonstrators will receive an additional $30 to put toward bonus products in their Starter Kit. THEN, you’ll receive a $10 coupon code the following month to spend on whatever you want! Have questions about what to put in your Starter Kit??? Just contact me and I will help get you on the right track.
Promotions


Comments
Post a Comment