Posts

Showing posts from 2015

Flourish Card

Image
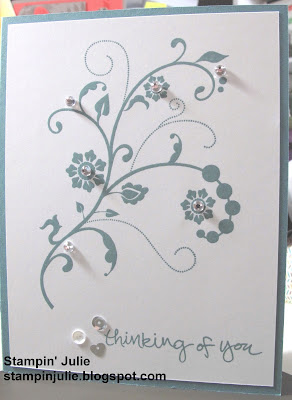
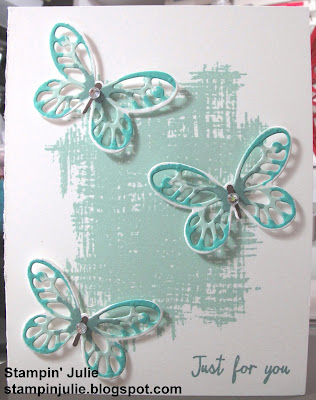
     Welcome to my blog today. Do you like simple? Well I have a very simple card to make today.  It involves only 5 things, stamps, paper, ink, rhinestones, and sequins. Very simple. I used the Stampin' Up! stamp sets, Flowering Flourishes, and Sheltering Tree. I started with Lost Lagoon and Whisper White cardstock. I stamped the largest flourish in Lost Lagoon the stamped it on the Whisper White. I then took one of the sentiments from Sheltering Tree and stamped it in the lower corner in Lost Lagoon as well. I then placed rhinestones on various dots and the center of the flowers. Next, I placed 3 sequins next to the sentiment. Here are the details: Julie's Detailed Shopping List Built for Free Using: My Stampin Blog      Well, I hope I have given you something simple. It would be very easy to replicate. So give it a try. If you need this stamp set just click on the link above and it will take you to my store. Also, if you need a catalog just let me know and

Cupcake Card

Image
     Hi everyone! How was your 4th of July this past weekend. It rained so much where I live they had to cancel the fireworks. Oh well. Maybe next weekend. On to our project. Today I have a card I made using some really cute things. I started with the Stampin' Up! stamp set Sprinkles of Life. This is our Ronald McDonald House Charities stamp where $3 from every stamp set sold is donated to RMHC. What a great cause. Next, I used the Stampin' Up! paper pad Cherry On Top. Talk about some beautiful paper and you get 4 pieces of every pattern. I cut it to 4"x 5-1/4"and adhered it down onto a Watermelon Wonder base. Then I cut the Crushed Curry and Whisper White cardstock and adhered it onto the card base with Stampin' Dimensionals. Next I made the cupcake and stamped the sentiment right below the cupcake. Then I punched the banner out using the Banner Punch. I just used the back side of the pattern paper. I tied little bows to put into the corners with Whisper White

Saturday Bonus - Another Birthday Card

Image
     Welcome and happy Saturday. I hope your weekend is going good so far. I have a bonus this Saturday with another birthday card for you. I got the idea of the card from Pinterest, but I changed a few things up. I think it came out really good and I like it a lot. First I made the butterfly by using Stampin' Up! stamp set Watercolor Wings. I used Marina Mist for the first layer, Island Indigo for the second layer and Night of Navy for the last layer. I then used the Butterflies Thinlits to die cut the butterfly with my Big Shot machine. I then placed 3 rhinestones on it's back. Next, I stamped the card base with the Stampin' Up! stamp Watercolor Wash in Crumb Cake. I just got this stamp and I am loving it. I placed the butterfly in the upper corner popped up with Stampin' Dimensional. I stamped the sentiment in Basic Black using the stamp set Watercolor Words. I think I should of used Staz On Black instead. I believe it would of came out darker. Oh well. So what do

Happy Birthday Card

Image
     Hello and welcome to my blog Stampin' Julie. Sorry for the lateness of this post as I just totally forgot what day it was. This happens a lot when you don't work outside of your home. All the days flow together and you forget which day it is. Now on to my project. Today I have a birthday card for you. I saw this card on Pinterest and just fell in love with it and knew I wanted to give it a try. I did change a couple things though, like the base card color and such. It is a super easy card to make as well. It takes the Stampin' Up! stamp sets Crazy About You and Celebrate Today along with the Thinlits Hello You and Framelits Balloons. You also need the paper pad Cherry On Top with Watermelon Wonder, Crushed Curry, Cucumber Crush, Bermuda Bay, and Whisper White. For ink you need Bermuda Bay. See, super easy list. First, I die cut the Happy and the Balloon. Then I cut all the paper that it needed, then I started putting it together. I layered the balloon paper onto the

Butterflies Card

Image
     Hi and welcome to my blog! Do you love butterflies? Have you noticed how much they are showing up in fashion, art, and such. They sure have become popular right now and are extremely trendy. That is why I created this card. I used two new stamp sets from Stampin' Up!'s new 2015-2016 catalog. They are You've Got This and Watercolor Wings Bundle which comes with framelits. I used the background stamp from You've Got This in Pool Party. Then I stamped the butterflies in three steps. First in Pool Party. Next, in Bermuda Bay. Finally, in Lost Lagoon. What a beautiful color combo this is. They play off of each other perfectly. Next, I die cut them out using the Big Shot and Bold Butterfly Framelits. I then stamped the sentiment, from Watercolor Wishes, in Lost Lagoon. Next, I placed the butterflies onto the card base and popped them up with Stampin' Dimensionals. I then placed a rhinestone on each one. Here are all the items I used: Julie's Detailed Shoppi

Always Here For You Card

Image
     Hey everyone! Welcome to my first post of the week. Today I have a card I made using all Stampin' Up! items. First, I used two stamp sets; Friendly Wishes, and You've Got This. I first stamped the background stamp from You've Got This using Blushing Bride on a piece of Whisper White. Then I stamped the sentiment on top from Friendly Wishes in Basic Black. I then put rhinestones in each corner. Next, I embossed the bigger piece of Whisper White with the embossing folder Large Polka Dots. I then placed the smaller piece on the larger piece with Stampin' Dimensionals. Next, I adhered the whole thing onto a card base of Blushing Bride to match the background ink color. Here are all the items, if anything catches your eye just click on it and it will take you to my store. Julie's Detailed Shopping List Built for Free Using: My Stampin Blog           Well thank you very much for coming to my blog. Any friend would love to get this card and would

Friendship Card

Image
Hi everyone. Welcome to my blog today. I have a new post for the day showing this really cute friendship card. I have a dear friend who I love to make cards for so I came up with this idea using the new stamp set from Stampin' Up! called Friendly Wishes.

Cupcakes Card

Image
Hey there everyone! How are you all doing? I'm a day late with this as our cable was knocked out by a huge microburst that went through our town. We are finally back up and running so here is my blog for Wednesday. I was inspired to make this card by another I saw on Pinterest. They had used another stamp set but the result is pretty much close to the original. I picked out several Stampin' Up! stamp pads that I wanted to use plus the color of my card base. Next I punched out each cupcake with the Cupcake punch. Then I used the embossing folder Large Polka Dots and then I grouped the cupcakes together as in the original inspiration. Finally, I stamped the sentiment in Rose Red and my card is finished. Julie's Shopping Detailed List Built for Free Using: My Stampin Blog Well, there you go. Pray that our internet is safe and that tomorrow my blog will go up without a hitch. Remember that if you need a catalog and you are not currently working with another dem

Baby Boy Card

Image
     Hi and welcome back to my blog. Today I have for you a card that may look familiar. Last week I made a card like this for a girl and today I thought I would show you the boy version. It is pretty much made the same way I just changed out the colors and the sentiment. I started with a Stampin' Up! Very Vanilla card base and made my first layer out of Pool Party. Next, I cut the next layer out of the Stampin' Up! Designer Series Paper Sweet Li'l Thing. I love this paper, it is so cute. I stamped the lion from the Zoo Babies stamp set in Hello Honey onto a piece of Very Vanilla. Then I used my Lots of Labels dies and cut the lion out and then used Hello Honey cardstock to cut out the next size bigger to layer them. I used the same stamp set for the sentiment in Pool Party but used the Bitty Banners die to cut it out. Next, I used the Bow Builder Punch for the very cute bow out of Pool Party. Finally, I put everything onto the card front using some Snail adhesive, glue

Saturday Bonus Blog

Image
Hi and welcome to my blog. I have been real busy in my craft room making cards so I decided to share one with you today as a special bonus. I got the idea for this card from the 2015-2016 Stampin' Up! catalog on page 119 with the Garden in Bloom stamp set. There are some beautiful ideas in this catalog. Some would be really easy to recreate. I started with cutting a piece of English Garden and a piece of vellum to 4"x 5-1/4". Next, I stamped with the Garden in Bloom set onto the vellum with black Stazon ink. This is to guarantee that the ink would not run or smear. Next I layered the vellum onto the paper and then onto the cardstock and punched holes on the top for the ribbon. I weaved the white ribbon into the holes. The card is done, now how simple was that. Julie's Detailed Product List Built for Free Using: My Stampin Blog Well, thank you very much for coming to my blog and taking a look at my project. If you need a catalog email me and let me kno

Door Prize for Open House Card Set

Image
     Hello everyone! Welcome, welcome. Today I have a really cool card set that I created with a little inspiration from Pinterest. I saw a pin on there that was a card set using the Stampin' Up! Crazy About You stamp set that I fell in love with and knew I wanted to use this for idea I had for a door prize at my Open House I am having on the 27th for the new catalog and an Introduction to Stamping workshop. I started with, of course, the Crazy About You stamp set and Hello You Thinlit dies, both by Stampin' Up! and available in a bundle form where you will save 15% on the total price of the two items. Next, I chose to use the new Stampin' Up! Designer Series Paper (DSP) English Garden. Finally, I chose what cardstock I was going to use. In the catalog and on the back of the paper pack there is a list of coordinating cardstock that matches the DSP beautifully. I chose to use Blushing Bride, Hello Honey, Old Olive, Night of Navy and of course Whisper White. Now to design t

Triple Butterfly Card

Image
     Hello everyone! Today I have a project using Stampin' Up!'s new Bold Butterfly Framelits. I also used the great Stampin' Up! stamp set Butterfly Basics and Butterflies Framelits. I got the idea for this card from the new 2015-2016 Stampin' Up! catalog page 129. They used a different background stamp but I did not have that one so I used what I had and it is this stamp from You've Got This stamp set. I think it came out just as good. I also used a little different colors. I used Watermelon Wonder and Sahara Sands. I first stamped the middle butterfly with Watermelon Wonder and the background of the base card with Sahara Sand. Then I die cut all three out with my trusty Big Shot. I then popped the butterflies up with Stampin' Dimensionals and then placed a rhinestone on top. You would have your choice of whatever stamp you want inside.      Remember that on June 27th I will be having an Introduction into Stamping Open House/Workshop. So if you happen in

Congratulations Baby Card

Image
     Hello everyone! I am so sorry that it has been so long since my last post. I am going to start myself on a schedule, so from now on I will be posting every Monday, Wednesday, Friday. This will be a great schedule for me as it pushes me to get some projects done that I love doing. So here is the first one. It is this really cute baby card perfect for the parents of a new addition to their family. I think the bow really pushes it over the top. This card was made with new DSP from the new 2015-2016 Stampin' Up! catalog. I had so much fun making this card and it was so easy. Easy enough for you to CASE (copy and share everything) it.       Please if you need a catalog let me know. For just $6 I will send you a new 2015-2016 catalog. And please if you already have a Stampin' Up! demonstrator ask them first for a catalog.      Thanks so much for coming to my blog and taking a look at my cute baby card. I hope you have a great week! :)      Here are the items I used: Built

Card Trio

Image
     Welcome back to my blog! Today I have not one card, not two cards, but three cards to share with you.      What a fun time I had making these cards with my newest stamp and die set from Stampin' Up! "Crazy About You." This stamp set was so much fun to work with. You get the chose of using four thinlit dies, happy, thanks, hello and you. Then on the stamp set there are numerous sayings to go with them. Over 25 sentiments! That is a lot. The combinations are endless. Plus I also used some of the new Stampin' Up! In Colors for the next two years. These are some gorgeous colors and you can make some great things with them. Here are the details: Paper: Stampin' Up! Watermelon Wonder, Cucumber Crush, Delightful Dijon, Mint Macaron, and Island Indigo Stamps: Stampin' Up! Crazy About You Ink: Watermelon Wonder, Pear Pizzazz, Delightful Dijon, and Mossy Meadow Dies: Hello Thinlits by Sizzix Die Machine: Big Shot by Sizzix for Stampin' Up! Adhesive

2015-2016 Catalogs Are Here!

Image
Well today is the day!!! The new 2015-2016 catalog is here for all to see! This catalog is amazing with all the new items you can get. So many new stamp sets I am having a hard time deciding which to get first. I hate having a limited budget. Lol. Visit here to see the new catalog and all the new stuff you are going to drool over. If you need a catalog just let me know. Paypal me at scrapnmom@live.com $6.00 to cover shipping and I will get one in the mail to you. If you already have a demonstrator please ask them first for a catalog.       Well, have a great week and thank you for coming to my blog! :)

Coffee Card

Image
Well, hello and welcome to my blog. Here we have my latest creation. This card was so fun to make and I can't wait to give it to a friend who does drink a lot of coffee. I first stamped all three coffee cups with Early Espresso on Whisper White and cut them out. I then stamped the same three again this time using Baked Brown Sugar for the paper and again Early Espresso and cut just the center section out. I glued it onto the center of the white cup. Next, I embossed the Real Red background paper using the Large Polka Dot embossing folder and Stampin' Up! Big Shot. It came out so good. I wrapped some 1/4" Cotton Ribbon in Whisper White around this layer and adhered the Real Red layer onto the Early Espresso card base. Next, I stamped the sentiment onto some Whisper White and punched it out with my Stampin' Up! Label punch. Finally, I adhered the sentiment onto the card with Stampin' Dimensionals. Here are all the details: Paper: Stampin' Up! Early Espresso,

Cupcake Card

Image
     Here is the latest project I did for National Scrapbooking Day. I wanted something to celebrate the day but also something bright and cheerful. I think this card fits the bill just perfect.      I started with cutting a piece of Melon Mambo in half then folded the card in half for my card base. I then cut a piece of Daffodil Delight to 3-3/4" x 5" and a piece of Whisper White to 3-1/2" x 4-3/4". I glued the Whisper White onto the Daffodil Delight. I stamped the Celebrate You onto the layered Whisper White. I then got started on the cupcakes. First, I stamped all the  components of the cupcakes onto a piece of Whisper White. Next, I used the Cupcake Builder punch and punched out all the pieces. I then used some Stampin' Dimensionals to pop up the cupcake pieces. Finally, I glued the layers onto the Melon Mambo card base and the card is finished.      I hope you had a great National Scrapbooking Day and you got a lot accomplished. Thank you so much for

Yet Another Butterfly Card

Image
Welcome, welcome to my blog. I hope you are having a great day to far. Today, I have another butterfly card for you using the Butterfly Basics stamp set from Stampin' Up! and the Butterflies Thinlits that I used on my Big Shot to cut out. I first used a piece of So Saffron and cut it in half to make the card base. I then cut a piece of Calypso Coral to 5-1/4" x 4" and a piece of Whisper White to 5" x 3-3/4". I first stamped the leaves from the stamp set in Pear Pizzazz on the piece of Whisper White. Next, I stamped the honeycomb in So Saffron in the upper left corner and the date stamp in early Espresso on top. Then I stamped the sentiment in Calypso Coral in the lower right corner under the leaves. Now onto the butterflies. I stamped the twp smaller butterflies onto a piece of Whisper White. I then punched the smallest butterfly out. Next, I used my Big Shot to cut out the large butterfly in both Lost Lagoon and Vellum. Then I adhered the layers together and

Another Butterfly Card

Image
Hello and welcome to my blog! Happy Monday to you all. Today I have a card for you using the Butterfly Basics again. I am in LOVE with this stamp and die set. It has been my number one right now and I really hope that both items are not retired and are brought back in the new catalog. I first started with stamping the border on the side in Lost Lagoon. Then I stamped the leaves in Mossy Meadow keeping the stem together some what but fanning out the leaves. Next I stamped the sentiment at the top in Tangelo Twist. Now on to the die cutting. Using my Stampin' Up! Big Shot I first stamp the butterfly in Hello Honey then I die cut it out with the Butterflies Thinlits dies. Then I stamp the smaller butterfly on the paper and punch it out using the Bitty Butterfly punch. I then attach the two butterflies using Stampin' Dimensionals. The front then gets adhered to the card base of Tangelo Twist. I then added the cute little trial behind the smaller butterfly. Here are the details:

Butterfly Card

Image
     Welcome back to my blog! I'm so sorry for the delay in posting anything as life just got in the way for me. I have, however, come up with a posting schedule for this blog and it will be a new post every Monday, Wednesday, and Friday with an occasional Saturday. This way I am on a organized schedule that I can pre-post for and not worry when life comes calling for me. So expect a new post tomorrow morning about 6am PST.      Today I have a treat for you as yesterday I received my Butterflies Thinlits Dies from Stampin' Up!. I am so excited to use them and play around with the different dies. I had already ordered the Butterfly Basics stamp set from Stampin' Up! so I had everything I needed to make this really cute card. I first cut my 8-1/2" x 11" Mossy Meadow paper in half to make two card bases. I then cut a piece of Whisper White down to 4" x 5-1/4" for my base layer. Next, I stamped the leaves in Mossy Meadow onto the Whisper White and then I

Thankful Sheltering Tree Card

Image
Well, hello everyone and welcome to my blog! Today I have this really cute card I made for my mom and I can't wait to send it to her. It was so much fun to make. I really love this stamp set and the ability to make the tree any season. I chose Spring because that is what we are in right now and it is my mom's favorite season. Here are the details: Paper: Stampin' Up! Pear Pizzazz, Whisper White Stamp: Stampin' Up! Sheltering Tree Ink: Early Espresso, Blushing Bride, Pear Pizzazz, Chocolate Chip, Strawberry Slush, Rose Red, Mossy Meadow Adhesive: Stampin' Up! Snail Thank you so much for coming to my blog and taking a look at my most favorite card so far that I have done. If you like what you see, visit my site to order the items listed and if you live in my area contact me and we can do this card as a make n take at your workshop. Have a great day! :)

Mr & Mrs Card

Image
Hi!

Cutest Baby Card

Image
Welcome back to my blog! Today for you I have this cute baby card for a little girl. I started with using Stampin' Up! paper in Blushing Bride and stamp set Label Love. I just got this stamp set and punch in a recent order and couldn't wait to use it. Here are the details: Paper: Stampin' Up! Blushing Bride, Whisper White, Vellum. Ink: Whisper White Stamp: Label Love Punch: Artisan Punch, Bitty Butterfly Embossing Folder: Perfect Polka Dots Extras: White Pearls, White Embossing Powder, Stampin' Trimmer Thank you so much for coming to my blog today. And I hope I have inspired you in some way. If you would like to order any of the above just visit my website here . Have a great day! :)

Happy Birthday Balloon Card

Image
So sorry for such a delay in my posting but I was on vacation in California for a couple weeks. Then it took a few days to get my mojo back into card making mode. Well, while in California I got a huge order from Stampin' Up! so I got some new items. Here is one of them with this cute card I made using the Celebrate Today stamp set and Balloon Framelits dies. These were a blast to play with. You do need the Big Shot to use the dies though. Here are the details: Paper: Stampin' Up! Calypso Coral, Whisper White Stamps: Stampin' Up! Celebrate Today Dies: Balloon Framelits Ink: Calypso Coral, Crisp Cantaloupe, Early Espresso Sequins: Stampin' Up! In Color Sequin Assortment, Gold Trim I hope you like this card and please leave a comment. Thank you so much for coming to my blog and looking at my posts. Have a great day! :)

Love Banner Card

Image
I know that Valentine's Day in well past but I wanted to do this card really bad. I took 3 Stampin' Up! stamp sets and used them together. I love how it came out. It was a really easy card to do too. Here are the details: Cardstock: Whisper White Stamps: Itty Bitty Baby, Build a Bouquet, Perpetual Birthday Calendar, You Brighten My Day Ink: Real Red, Blushing Bride, Basic Black Punch: Banner Punch Adhesive: Stampin' Dimensionals Thank you so for coming to my blog and looking at this really cute card. I plan on giving it to my husband as a just because I love you card. He will love it. Thanks again and have a great day! :)

Rainbow Birthday Card

Image
Hello there and welcome. Ever need a quick birthday card? Well here is one that will fit the bill. I just chose 8 rainbow colored Stampin' Up! ink pads and stamped the Itty Bitty Banners Happy Birthday stamp several times. I then attached them to the card base with Stampin' Dimensionals. I used some White ribbon tied around the card to finish it off. It came out perfect.

Simply Wonderful Card

Image
I thought I would do a card using just the 2014-16 In Colors. I found my inspiration on Pinterest. I changed a few things like where I put the title, but it came out pretty good.

Vellum Flower Card

Image
Here is a beautiful card I made with embossing vellum. I used the Stampin' Up! stamp set Flower Shop and Pansy Punch for this card. I also used the Itty Bitty Banners stamps and Bitty Banner Framelits. I first embossed the vellum then punched it out. Then I stamped the banner and cut it out with my Big Shot #113439 which of course can be purchased online from Stampin' Up! too. Here are the details: Cardstock: Stampin' Up!-Lost Lagoon #133679, Whisper White #100730 Stamps: Stampin' Up! - Flower Shop #130942, Itty Bitty Banners #126257 Punch: Stampin' Up! - Pansy #130698 Framelits: Stampin' Up! - Bitty Banner #129267 Ink: Stampin' Up! - Whisper White #101731, Lost Lagoon #133644 Embossing Powder: Stampin' Up! - White #109132 Adhesive: Stampin' Dimensionals #104430 Thank you so much for coming to my blog and looking at my site. Also you can place an order from me for anything that you have seen here . Have a great weekend! :)

Happy Birthday Card

Image
     How is everyone doing? Here is a new card I created for a Happy Birthday. This card was so fun to make too. I love the look of the 3 different color of inks. And then the cut out banner on it too was not hard to do. You just stamp an extra one and cut it out. Here are the details: Paper: Stampin' Up! Sale-A-Bration Designer Series Paper - Best Year Ever #138633 Cardstock: Whisper White #100730 Stamps: Stampin' Up! Sale-A-Bration stamp set Big Day #139112 Ink: Bermuda Bay #131171, Daffodil Delight #126944, Calypso Coral #126983 Ribbon: Stampin' Up! White #134549 Adhesive: Stampin' Up! Snail adhesive #104332      Remember that the Sale-A-Bration items are only good until 03/31/15 with every $50 you spend. Order on my website here . I really hope you like this card and thank you for coming to my blog and looking. Have a great day! :)

Welcome Baby Card

Image
Hi and welcome! Here is a cute baby card I did.

Flowers and Vellum Card

Image
Hello and welcome back to my blog. Here is a card I did using vellum with embossing and placed on cardstock.

A Gift For You Card

Image
Hi and welcome to my blog.

Sent With Love Card

Image
Hello and welcome back to my blog! I have another card today that again I used the retired stamp set "Sent With Love." First, I embossed the paper with the Heart mask and Pistachio Pudding ink. I then embossed the stamp Sent with love onto the card using Whisper White embossing powder. Then I stamped 3 of the heart stamps using 3 different inks, Strawberry Slush, Crisp Cantaloupe, and Coastal Cabana. I placed them onto the card using some Stampin' Dimensionals. Here are the details: Paper: Stampin' Up! Whisper White and Pistachio Pudding Stamps: Stampin' Up! Sent With Love Ink: Stampin' Up! Coastal Cabana, Crisp Cantaloupe, Pistachio Pudding, Strawberry Slush Adhesive: Scotch, Stampin' Up! Thanks so much for coming to my blog and looking at my project. Have a great day. :)

Stampin' Up! Order

Image
Well it finally came and I am so excited.

Special Delivery Card

Image
I love making baby cards and this card was a blast to make. I used a retired stamp set for this one, "Sent With Love." I decided to emboss with this card as black seemed to harsh for the sentiment. I used white Stampin' Emboss Powder along with Whisper White ink pad.

Balloon Card

Image
I am having such a fun time making cards with my stamps. I have another order coming tomorrow, Thursday 03/19, and I can't wait for it as I got some more stamps and some punches to go with them.

Flower Card

Image
I have been really loving making cards with Stampin' Up! products. 

House Card

Image
Here is another card I did only using my Stampin' Up! products. I used the new stamp set from Sale-A-Bration event going on right now until 03/31/15. The stamp set is "You Brighten My Day". You can get it for free with every $50 you order.

Brighten Up Card

Image
Here is a cute tag that I made with the inspiration from Heather Klump. You can see it here . I did mine a little different by making mine a tag instead of a card. I am using the Stampin' Up! stamp set "You Brighten My Day" which is only available when you place an order for at least $50.

Bloom Card

Image
Here is my next Stampin' Up! card I have made. I used a retired stamp set with this card.

Star Card

Image
Here is my card made with just Stampin' Up products. I had a great time making it too.

Thank You Card

Image
This is my first card I have made with exclusively Stampin' Up! products. I got my starter kit yesterday and couldn't wait to make something with it.
Hi and welcome to my blog!