Posts

Showing posts from 2016

13 Nights of Halloween - Day 1

Image
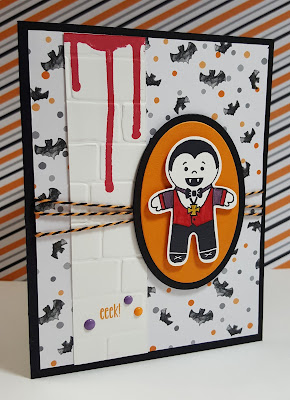
     Well, it has been awhile since my last post. Life has been a complete roller coaster ride these last few months, but now I am ready to get my business going again.      Today for you I have my series called 13 Nights of Halloween. Each day I will be sharing with you a new Halloween project ranging from cards to treats to a cute haunted house treat holder. All the items I have made use only Stampin' Up! products and I will included the ingredients for each project and a link to my 24/7 online store to purchase each item. Well, enough of that lets get on with today's project!      For you today I have a cute card I have made using the stamp set called Cookie Cutter Halloween.  Along with this stamp set, I also used Spooky Fun, and Ghoulish Grunge.  I almost always start off with an A2 size card either vertical as seen here or horizontal. This size is a standard among card makers. It is nothing but a 8-1/2"x 11" paper cut in half either way and then folded in ha

Technique Tuesday - Watercoloring

Image
Hi and welcome to my blog! Today I have a really cool technique for all of you. I will be doing some water coloring with Stampin' Up! Aqua Painters. I got the idea from a fellow demonstrator named Patty Bennett. Her video is here . I did do my own video showing the technique I did which I have down below.      Here are the products I used for this project:      Thank you so much for coming to my blog and watching my video to learn this really fun technique. I hope you try it out too. Go here to go to my Stampin' Up! store to purchase any of the products I used. Just click on the Shop Now button. And if you like to join my Stampin' Up! team and become a demonstrator too I would love to have you! Go to the same place as above and click on the Join Now button. For just $99 you can choose $125 worth of product. What a great deal! You can get the discount and just do it as a hobby or really turn it into a full time business. It is up to you.      Thanks again an

Stampin' Up! Unboxing Video

Image
     Hi everyone! I have a special blog for you today. Kind of an bonus blog. It is a video of me opening my latest order from Stampin' Up! I am a Stampin' Up! demonstrator and I hope you like it as it is my first video.      Thank you so much for coming to my blog and taking a look at my video. If you would like to purchase any of the items I received today just go here  and click on Shop Now.      Have a great day! If you have any questions or comments leave them down below. Thanks!

Big Shot Saturday - Congrats Card

Image
     Hi and welcome to my blog! Today is Big Shot Saturday which means that I will show a project using the Stampin' Up! Big Shot die cutting machine. Eventually I will be videoing these for you to watch my process but I don't have the set up yet.  So for today I will just have pictures.       Today, I have a Congrats card I made using my Big Shot machine for several components. I first  started with cutting my 8-1/2 x 11 paper in half to make two 4-1/4 x 5-1/2 card bases. I used the color Crushed Curry. I then cut a piece of the It's My Party DSP paper pack to 4 x 5-1/4 for my first layer. Then I got out my Big Shot.       I first used the Star Framelits dies and cut out the second from the largest star die in another piece of It's My Party paper. Next, I cut out the next star die down in Mint Macaron. Then, I used the Large Numbers Framelits dies to cut out the 2,0,1, and 6 in yet another piece of It's My Party paper stack. It is so easy to use this machin

Project Thursday - March Paper Pumpkin

Image
     Happy Thursday everyone and welcome to Project Thursday here at Stampin' Julie. Today I will be showcasing the new March Paper Pumpkin kit. This month Paper Pumpkin celebrated it's 3rd anniversary and it's one millionth box. To show for this our boxes were decked out in a beautiful Stampin' Up! blue called Bermuda Bay. And as a special Thank You to all it's subscribers next month in the April box we will be getting a free stamp set. So if you are not signed up with Paper Pumpkin you can do so through me here . You need to do it by the 10th of April in order to receive the April kit with the free stamps. So what are we waiting for...lets move on to this month's kit!      So to start I took several pictures of the various steps to putting this kit together per the instructions. Then I took some pictures of an alternative way of putting it together. First, we have a picture of the contents of the kit. If you have not received a kit before your first k

Technique Tuesday - Basket Weave Card

Image
Welcome again to my blog. I have thought about it and have decided that I am going to blog at least 3 days per week with each day being a different kind of teaching idea.      Today, I decided to name Tuesday Technique Tuesday where I am going to show you a new type of technique to use on your cards. For today's card I want to show you how to do the Basket Weave edge. I first started with using Thick Whisper White cardstock and cutting the edge of the card at an angle down the side in even numbers. Then you cut the bottom angle out and glue it in place at the top. Now fold down all the little cut pieces and tuck them under the next unfolded piece. I didn't use any glue to hold them down. They stay down pretty good. After folding you have a beautiful edge on your card and it is now time to decorate the front. I cut the first layer to in Watermelon Wonder. Next, I cut the next layer to in Whisper White. I then stamped the images in Watermelon Wonder and Pear Pizzazz from the s

Balloon Card

Image
Hi everyone! How are you all doing? Today was a very busy day. I did however find the time to make this really cute birthday card. Anyone you give this card to will be very happy with it. And it is very perfect for anyone from a child to an adult. It uses all products from Stampin' Up!      I first started with the background paper which is from the Cherry On Top paper stack. I then tied a piece of Cucumber Crush Dotted Lace around the bottom area. I used the Lots of Labels framelits and the Big Shot to make the tag. I then used the stamp set Party Wishes to stamp the sentiment onto the tag along with the candles. I punched the balloons using the punch from the Party Punch pack. I used the paper from the same paper stack. I first put the layer onto a piece of Whisper White cut to 5-1/2"x 8-1/2" then folded in half. I then adhered the layer down and placed the balloons randomly around the card with Stampin' Dimensionals. Next, I adhered the tag onto the card using S

Hello Card

Image
     Here I am. Boy has life been busy. I have been making cards like crazy but I just haven't had the time to post any.       Well, here is this one. My mojo has been a little on the lacking side lately so I was really struggling for some inspiration on what to make when I finally decided to pull out some color first and start from there. I decided to start with Pink Pirouette. Next, I choose Crumb Cake and finally, Pear Pizzazz and Wild Wasabi. I next pulled a punch which turned out to be my Petite Petals punch so I grabbed the Petite Petals stamp. I also choose the Hardwood background stamp. I started with stamping the background stamp onto a piece of Crumb Cake that measures 4"x 5-1/4" using Crumb Cake ink. Next, I grabbed a piece of Whisper White and punched it with the Triple Banner punch. Then I stamped 2 different designs of the Petite Petals stamps using Pink Pirouette ink. I then punched out the 3 flowers. Then I wanted some leaves with my flowers so I got th

Basket Weave Card

Image
Hello fellow crafters! 

Cake Card and Embossing

Image
Welcome back to my blog! I have a really cool technique today to share and show to you. 

Love You Card

Image
Hi again! I am back with another card for Valentine's Day. I was inspired to make this card by the sample on pg. 133 of the Stampin' Up! annual 2015-2016 catalog. I didn't have any gold foil paper at the time so I used the red foil paper I had left over from Christmas. It came out great too. The stamping I have to admit was the hardest part of this project. I used a background stamp and a large alpha stamp to create this. I noticed that my letters are a little crocked but for my first try I was happy with it. Here is a list of what I used: Built for Free Using: My Stampin Blog I first stamped the background stamp on both the Whisper White A2 sized card, then I stamped it again on the 3-1/2"x 3-1/4" piece of Whisper White cardstock in Blushing Bride. I then stamped each of the letters in Basic Black on the smaller piece of cardstock making sure that I lined them up the best I could. You have to make sure that the stamp is good and saturated in ink too for bes

I'm Back!

Image
I'm back!!! After taking a short break from my Stampin' Up business I have decided that I missed it way too much so I have been busy with making a ton of cards. I can't guarantee that I will be posting 3 days a week as before as I also own a Planner Sticker Etsy shop Plannergirls, but I will definitely try! For today I have a really cute card I made for Valentine's Day. It is a pretty simple card to make too. I just stamped the heart several times in 2 different colors. I then stamped the Love in the new Basic Black ink pad. I am loving this new black! It stamps so cleanly and in a beautiful black color. Nice and dark. Here are the items I used to make this card: Built for Free Using: My Stampin Blog Thank you so much for coming back to my blog to look at my project. I have so missed working with my stamps and business, so if you need a Stampin' Up demonstrator just send me an email and I will gladly help you out. Well, that is it for now but I wil