13 Nights of Halloween - Day 1
Well, it has been awhile since my last post. Life has been a complete roller coaster ride these last few months, but now I am ready to get my business going again.
Today for you I have my series called 13 Nights of Halloween. Each day I will be sharing with you a new Halloween project ranging from cards to treats to a cute haunted house treat holder. All the items I have made use only Stampin' Up! products and I will included the ingredients for each project and a link to my 24/7 online store to purchase each item. Well, enough of that lets get on with today's project!
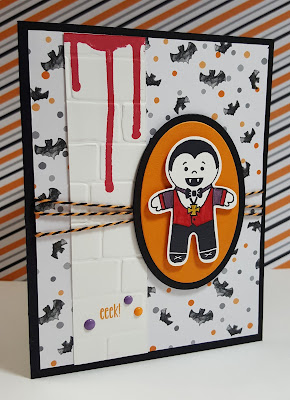
For you today I have a cute card I have made using the stamp set called Cookie Cutter Halloween. Along with this stamp set, I also used Spooky Fun, and Ghoulish Grunge. I almost always start off with an A2 size card either vertical as seen here or horizontal. This size is a standard among card makers. It is nothing but a 8-1/2"x 11" paper cut in half either way and then folded in half. The card comes out to be 4-1/4"x 5-1/2". I also used the Halloween Night series in the paper, baker's twine, and enamel dots. I first stared by stamping the vampire in Basic Black onto a piece of Whisper White. Next, I colored him in with the Stampin' Up Write Markers in Perfect Plum, Real Red, and Daffodil Delight. I used the Gold Wink of Stella pen on his medallion. Then I punched him out with the Cookie Cutter Builder Punch. I next cut the 2 ovals out using my Big Shot and the Layering Ovals Framelits, the smaller one in Pumpkin Pie, the larger one in Basic Black and then I adhered them together with my Snail. I then used Stampin' Dimensionals to pop up the vampire onto these ovals and set it aside.
For the card, I cut a piece of the Halloween Night DSP to 4"x 5-1/4. Next, I cut a piece of Whisper White cardstock to 1-1/4"x 5-1/4" and stamped the dripping blood stamp from Ghoulish Grunge at the top in Real Red. I then used my Big Shot and the Brick Wall TIEF to emboss it. I adhered it onto my paper using my Fast Fuse. The Fast Fuse works better with the dry embossed things as it is a stronger adhesive. Next, I tied the Halloween Night Baker's Twine around the paper three times and adhered in the back. Then I adhered this paper onto a cut A2 sized piece of Basic Black with my Snail. I put the vampire piece on the right side of the card using more Stampin' Dimensionals. Finally, I stamped Eek! onto the card using this stamp from Spooky Fun in Pumpkin Pie. I surrounded it with three Halloween Night Enamel Dots. I had not done it yet, but you may want to place a 4"x 5-1/4" piece of Whisper White on the inside of the card so you are able to write a note to whoever you are sending this to. All done!
Do you like the card? Isn't it adorable! Whoever receives this card is going to love it. Remember you can purchase any of the items I used for this card from my Stampin' Up! store 24/7 here. Please feel free to contact me here if you have any questions. Also, if you are not already working with another Stampin' Up! Demonstrator I would love to send you a free catalog. Just contact me here.
Thank you so much for coming to my blog and checking out my 13 Nights of Halloween event! I hope you all are having a great week and I will see you soon with my next project.
Today for you I have my series called 13 Nights of Halloween. Each day I will be sharing with you a new Halloween project ranging from cards to treats to a cute haunted house treat holder. All the items I have made use only Stampin' Up! products and I will included the ingredients for each project and a link to my 24/7 online store to purchase each item. Well, enough of that lets get on with today's project!
For you today I have a cute card I have made using the stamp set called Cookie Cutter Halloween. Along with this stamp set, I also used Spooky Fun, and Ghoulish Grunge. I almost always start off with an A2 size card either vertical as seen here or horizontal. This size is a standard among card makers. It is nothing but a 8-1/2"x 11" paper cut in half either way and then folded in half. The card comes out to be 4-1/4"x 5-1/2". I also used the Halloween Night series in the paper, baker's twine, and enamel dots. I first stared by stamping the vampire in Basic Black onto a piece of Whisper White. Next, I colored him in with the Stampin' Up Write Markers in Perfect Plum, Real Red, and Daffodil Delight. I used the Gold Wink of Stella pen on his medallion. Then I punched him out with the Cookie Cutter Builder Punch. I next cut the 2 ovals out using my Big Shot and the Layering Ovals Framelits, the smaller one in Pumpkin Pie, the larger one in Basic Black and then I adhered them together with my Snail. I then used Stampin' Dimensionals to pop up the vampire onto these ovals and set it aside.
For the card, I cut a piece of the Halloween Night DSP to 4"x 5-1/4. Next, I cut a piece of Whisper White cardstock to 1-1/4"x 5-1/4" and stamped the dripping blood stamp from Ghoulish Grunge at the top in Real Red. I then used my Big Shot and the Brick Wall TIEF to emboss it. I adhered it onto my paper using my Fast Fuse. The Fast Fuse works better with the dry embossed things as it is a stronger adhesive. Next, I tied the Halloween Night Baker's Twine around the paper three times and adhered in the back. Then I adhered this paper onto a cut A2 sized piece of Basic Black with my Snail. I put the vampire piece on the right side of the card using more Stampin' Dimensionals. Finally, I stamped Eek! onto the card using this stamp from Spooky Fun in Pumpkin Pie. I surrounded it with three Halloween Night Enamel Dots. I had not done it yet, but you may want to place a 4"x 5-1/4" piece of Whisper White on the inside of the card so you are able to write a note to whoever you are sending this to. All done!
Here are the details:
Thank you so much for coming to my blog and checking out my 13 Nights of Halloween event! I hope you all are having a great week and I will see you soon with my next project.


Cute project for our Holiday papers challenge. So glad you joined the fun at SUO!
ReplyDeleteLove that little dracula...too cute! Thanks for playing long with the holiday papers challenge this time on SUO Challenges!
ReplyDelete