Posts

Showing posts from March, 2016

Big Shot Saturday - Congrats Card

Image
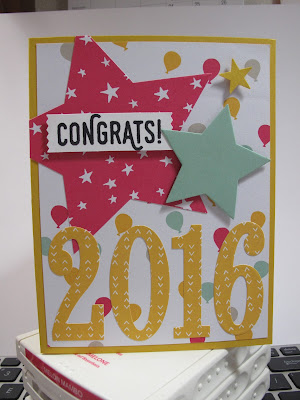
     Hi and welcome to my blog! Today is Big Shot Saturday which means that I will show a project using the Stampin' Up! Big Shot die cutting machine. Eventually I will be videoing these for you to watch my process but I don't have the set up yet.  So for today I will just have pictures.       Today, I have a Congrats card I made using my Big Shot machine for several components. I first  started with cutting my 8-1/2 x 11 paper in half to make two 4-1/4 x 5-1/2 card bases. I used the color Crushed Curry. I then cut a piece of the It's My Party DSP paper pack to 4 x 5-1/4 for my first layer. Then I got out my Big Shot.       I first used the Star Framelits dies and cut out the second from the largest star die in another piece of It's My Party paper. Next, I cut out the next star die down in Mint Macaron. Then, I used the Large Numbers Framelits dies to cut out the 2,0,1, and 6 in yet another piece of It's My Party paper stack. It is so easy to use this machin

Project Thursday - March Paper Pumpkin

Image
     Happy Thursday everyone and welcome to Project Thursday here at Stampin' Julie. Today I will be showcasing the new March Paper Pumpkin kit. This month Paper Pumpkin celebrated it's 3rd anniversary and it's one millionth box. To show for this our boxes were decked out in a beautiful Stampin' Up! blue called Bermuda Bay. And as a special Thank You to all it's subscribers next month in the April box we will be getting a free stamp set. So if you are not signed up with Paper Pumpkin you can do so through me here . You need to do it by the 10th of April in order to receive the April kit with the free stamps. So what are we waiting for...lets move on to this month's kit!      So to start I took several pictures of the various steps to putting this kit together per the instructions. Then I took some pictures of an alternative way of putting it together. First, we have a picture of the contents of the kit. If you have not received a kit before your first k

Technique Tuesday - Basket Weave Card

Image
Welcome again to my blog. I have thought about it and have decided that I am going to blog at least 3 days per week with each day being a different kind of teaching idea.      Today, I decided to name Tuesday Technique Tuesday where I am going to show you a new type of technique to use on your cards. For today's card I want to show you how to do the Basket Weave edge. I first started with using Thick Whisper White cardstock and cutting the edge of the card at an angle down the side in even numbers. Then you cut the bottom angle out and glue it in place at the top. Now fold down all the little cut pieces and tuck them under the next unfolded piece. I didn't use any glue to hold them down. They stay down pretty good. After folding you have a beautiful edge on your card and it is now time to decorate the front. I cut the first layer to in Watermelon Wonder. Next, I cut the next layer to in Whisper White. I then stamped the images in Watermelon Wonder and Pear Pizzazz from the s

Balloon Card

Image
Hi everyone! How are you all doing? Today was a very busy day. I did however find the time to make this really cute birthday card. Anyone you give this card to will be very happy with it. And it is very perfect for anyone from a child to an adult. It uses all products from Stampin' Up!      I first started with the background paper which is from the Cherry On Top paper stack. I then tied a piece of Cucumber Crush Dotted Lace around the bottom area. I used the Lots of Labels framelits and the Big Shot to make the tag. I then used the stamp set Party Wishes to stamp the sentiment onto the tag along with the candles. I punched the balloons using the punch from the Party Punch pack. I used the paper from the same paper stack. I first put the layer onto a piece of Whisper White cut to 5-1/2"x 8-1/2" then folded in half. I then adhered the layer down and placed the balloons randomly around the card with Stampin' Dimensionals. Next, I adhered the tag onto the card using S

Hello Card

Image
     Here I am. Boy has life been busy. I have been making cards like crazy but I just haven't had the time to post any.       Well, here is this one. My mojo has been a little on the lacking side lately so I was really struggling for some inspiration on what to make when I finally decided to pull out some color first and start from there. I decided to start with Pink Pirouette. Next, I choose Crumb Cake and finally, Pear Pizzazz and Wild Wasabi. I next pulled a punch which turned out to be my Petite Petals punch so I grabbed the Petite Petals stamp. I also choose the Hardwood background stamp. I started with stamping the background stamp onto a piece of Crumb Cake that measures 4"x 5-1/4" using Crumb Cake ink. Next, I grabbed a piece of Whisper White and punched it with the Triple Banner punch. Then I stamped 2 different designs of the Petite Petals stamps using Pink Pirouette ink. I then punched out the 3 flowers. Then I wanted some leaves with my flowers so I got th